الدعمالأسئلة الشائعة
الأسئلة الشائعة
الأسئلة الشائعة
يمكنك العثور على إجابات وطرح أسئلة في
مجتمع مستخدمي الكاتيل من جميع أنحاء العالم.
الأسئلة الشائعة
You can change the “app permission” in the Settings -> App permissions->selecting a topic. Use the toggles to switch individual permissions on or off.
You can check the information by accessing into menu -> “Settings” -> “System”-> “About phone”.
You have 3 ways to check the IMEI information:
Way 1: Check the IMEI information from the IMEI label which was stuck to the battery jar or battery cover
Way 2: By touching *#06# in dial keypad
Note: If the SIM card is not inserted to your phone, IMEI information may not appear on the screen. Please insert SIM to your phone then check the IMEI information again by typing *#06#.
Way 3: Go to main menu -> “Settings” -> “System” -> “About phone” -> “Status” -> “IMEI information”
Users can share what's on their screens more easily by taking screenshots. Hardware buttons let them snap a screenshot and store it locally. Afterward, they can view, edit, and share the screen shot in Gallery or a similar app.
Push power button and Volume down button at the same time for a couple of seconds. Or you can go to “Settings” -> “Advanced features” -> “Gestures”, enable 3 fingers screenshot, then swipe down with 3 fingers. You also can swipe down quick settings in idel screen, click screenshot icon to make a screenshot. You should then see an animation showing you the screenshot, and view the screenshot by tapping on the thumbnail in the notification tray or by visiting your Gallery application.
The first time you turn on the phone, you will see a welcome screen. You can start to set up your phone by following the instructions.
A series of screens will lead you through the setup process. You also have the option to skip some steps during the process.
You can set screen lock to prevent others from using this phone without your permission.
Go to “Settings” -> “Security & location” -> “Google Play Protect”.
Google launched the Google Play Protect function, which can be regarded as a virus scanner for Android applications. So far, the Google Play Protect team has scanned more than 50 billion times for this applications every day. The user will see the latest scan items in the Google Play application update window and find any problems happen in your phone recently.
Go to “Settings” -> “System” -> “Languages & input”-> “Autofill service”.
For the most commonly used applications on user devices, Android 8.0 will help users to log in quickly without having to fill out account names and passwords every time. For example, when a user uses a new device, the saved account name and password can be extracted from the Chrome. After selection, the automatic filling function can be carried out locally, suitable for most applications you may using.
Please go to “Settings” -> “Accessibility” -> “Accessibility Menu” -> Turn on “Accessibility Menu” -> “OK” -> the accessibility menu icon will appear on the navigation bar.
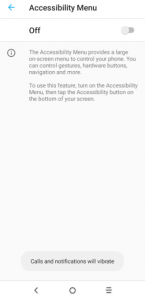
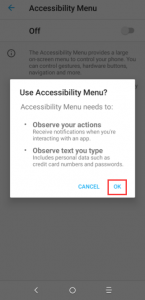
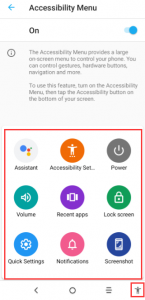
The Accessibility Menu provides a large on-screen menu to control your phone. You can control gestures, hardware buttons, navigation, and more.
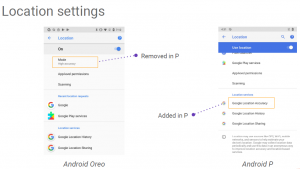
Three location modes in current Location settings:
1) High Accuracy - uses GPS, Wi-Fi and cell;
2) Battery Saving - uses Wi-Fi and cell;
3) Device Only - uses GPS only.
Confusing to users, and only High Accuracy mode has high usage. Remove location modes and introduce Location Accuracy toggle in Android P
a) Location On + Location Accuracy On = High Accuracy
b) Location On + Location Accuracy Off = Device Only
Change language of your phone by accessing into main menu -> “Settings” -> “System”-> “Languages & input” -> “Languages” -> “Add a language” -> Choose the language that you want to add -> Press and drag the language to the top to set.
You can change the “app permission” in the “Settings” -> “Apps” -> “App permissions” -> selecting a topic. Use the toggles to switch individual permissions on or off.
You can check the information by accessing into main menu -> “Settings” -> “System”-> “About phone”.
You have 3 ways to check the IMEI information:
Way 1: Check the IMEI information from the IMEI label which was stuck to the battery jar or battery cover.
Way 2: Enter *#06# in dial keypad.
Note: If the SIM card is not inserted to your phone, IMEI information may not appear on the screen. Please insert SIM to your phone then check the IMEI information again by typing *#06#.
Way 3: Go to main menu -> “Settings” -> “System” -> “About phone” -> “Status” -> “IMEI information”.
Users can share what's on their screens more easily by taking screenshots. Hardware buttons let them snap a screenshot and store it locally. Afterward, they can view, edit, and share the screen shot in Gallery or a similar app.
Way 1: Push power button and Volume down button at the same time for a couple of seconds.
Way 2: Go to “Settings” -> “Advanced features” -> “Gestures” -> Enable 3 fingers screenshot, then swipe down with 3 fingers.
Way 3: Swipe down quick settings in any screen, and then click screenshot icon to make a screenshot.
You should then see an animation showing you the screenshot, and view the screenshot by tapping on the thumbnail in the notification tray or by visiting your Gallery application.
The first time you turn on the phone, you will see a welcome screen. You can start to set up your phone by following the instructions.
A series of screens will lead you through the setup process. You also have the option to skip some steps during the process.
You can set screen lock to prevent others from using this phone without your permission.
Please go to “Settings” -> “Apps” -> “View all xx apps” -> touch menu icon in the top right corner of screen -> “Show system” -> “System UI” -> “App notifications” -> Uncheck Battery and Screenshots.
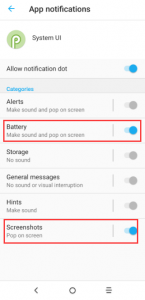
Note: After the above operation, the screenshot and low battery prompt will not appear in the status bar.
App Actions is a simple and effective way to help users quickly get what they need by using artificial intelligence and machine learning. This is a prediction entirely based on the user's own usage habits.
1) Actions in all APPs
Long press an app icon -> touch the widget icon![]() at the top right corner in the pop-up window, then all the widgets of this app will be displayed -> long press any of the widgets to create a shortcut.
at the top right corner in the pop-up window, then all the widgets of this app will be displayed -> long press any of the widgets to create a shortcut.
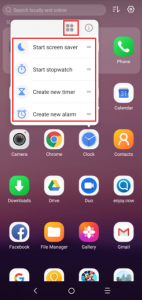
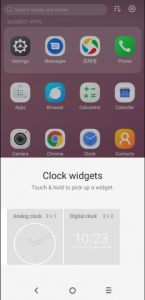
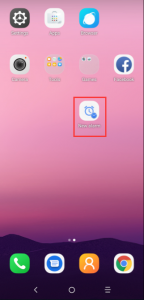
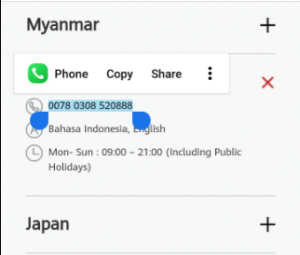
2) Actions in Selection
Actions for selected text:
Date / Time, Movie / TV shows, Restaurant, Sports Team / Athlete, Musician
Overview
Available in overview even when text selection is taken over by app
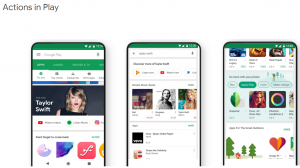
3) Actions in Play
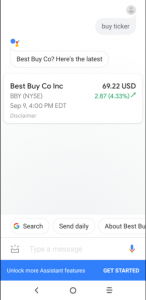
4) Android Actions in Assistant
Automatically get Assistant-enabled:
Built-in intents
Extensible
Compatible w/ Actions on Google
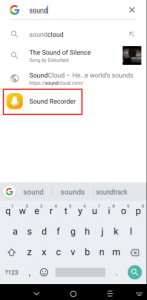
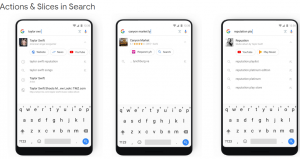
Slices can implement interoperability between each installed program in Google search. Its interface has shortcuts to certain features of the application, so users can more quickly and easily manipulate a specific feature in an application without opening it.
In order to protect your personal information, you can adjust your phone’s lock settings by accessing into main menu -> “Settings” -> “Security & location” -> “Screen lock” -> Touch the type of lock you would like to use.
After you set a lock, a lock screen displays whenever your screen is woken up, requesting pattern, PIN, or other specified key.
Notes:
Screen lock options are listed in the approximate order of the strength of their security, starting with “None” and “Swipe”, which provide no security.
On Android 8.1 or above, the boot of Pixel device only needs half of the original time, as well as the startup speed of application. Google has optimized the application startup process, including compressing garbage collected information and code areas. There’re also restrictions on background services to prevent applications from running in the background for too long. The goal is to greatly reduce battery consumption.
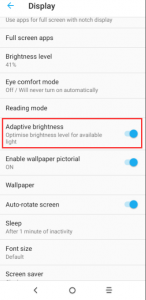
Go to “Settings” -> “Display” -> “Adaptive brightness”.
Your screen brightness will automatically adjust to your environment and activities. You can move the slider manually to help adaptive brightness learn your preference.
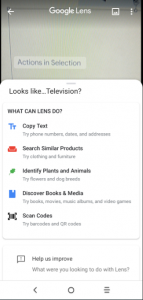
Google Lens can automatically recognizes and searches for the content which appears in the lens.
Press and hold home button![]() to enter Google assistant -> touch Google Lens icon
to enter Google assistant -> touch Google Lens icon ![]() at the bottom of screen.
at the bottom of screen.
When you open the Google lens viewfinder, Lens will continually analyze what you see to show you results in real time.
1) Copy text: Try phone numbers, dates, and address.
2) Search Similar Products: Try clothing and furniture.
3) Identify Plants and Animals: Try flowers and dog breeds.
4) Discover Books & Media: Try books, movies, music albums, and video games.
5) Scan Codes: Try barcodes and QR codes.
Go to “Settings” -> “Security & location” -> “Google Play Protect”.
Google launched the Google Play Protect function, which can be regarded as a virus scanner for Android applications. So far, the Google Play Protect team has scanned more than 50 billion times for these applications every day. The user will see the latest scan items in the Google Play application update window and find any problems happen in your phone recently.
Location API: Fused location provider. The fused location provider is a location API in Google play services that intelligently combines different signals to provide the location information that your app needs. It manages the underlying location technologies, such as GPS and Wi-Fi, and provides a simple API that you can use to specify the required qualify of service.
Users can use this feature to locate when they turn on the location and WIFI scanning. It measures the distance between the phone and the Wi-Fi access point (AP) that supports RTT.
You can turn on the WIFI scanning by accessing into menu -> “Settings” -> “Security & Location” -> “Location” -> “Scanning” -> “Wi-Fi scanning”.
Note: In order to protect privacy, this feature will not be connected to WIFI. It can only determine the distance from the AP to the device, and it can be accurate to the range of 1 to 2 meters.
Go to “Settings” -> “System” -> “Languages & input” -> “Autofill service”.
For the most commonly used applications on user devices, Autofill service will help users to log in quickly without having to fill out account names and passwords every time. For example, when a user uses a new device, the saved account name and password can be extracted from the Chrome. After selection, the automatic filling function can be carried out locally, suitable for most applications you may using.
Change language of your phone by accessing into main menu -> “Settings” -> “System”->“Languages & input” -> “Languages” -> Add a language-> Choose the language that you want to add ->Press and drag the language to the top to set.
On Android 8.1, the boot of your device only needs half of the original time, as well as the startup speed of application. Google has optimized the application startup process, including compressing garbage collected information and code areas. There’re also restrictions on background services to prevent applications from running in the background for too long. The goal is to greatly reduce battery consumption.
You can follow below steps to rename the Bluetooth.
1) Touch “Settings”.
2) Touch “Network & connection”
3) Touch “Bluetooth”.
*Make sure the Bluetooth is turned on.
4) Touch Device name.
5) A Window pop-up “Rename this device”.
Type the name you want and press “Rename” to save.
Some Bluetooth devices have multiple profiles. Profiles can include the ability to transmit your conversations, play music in stereo, or transfer files or other data. You can select which profiles you want to use with your phone. You can also change the name of the Bluetooth device.
You can follow below steps to unpair a Bluetooth device.
1) Touch “Settings” icon from Home screen or under main menu.
2) Touch “Network & connection”
3) Touch “Bluetooth”.
*Make sure the Bluetooth is turned on.
4) Touch the Quick Settings icon ![]() beside the connected Bluetooth device you want to configure.
beside the connected Bluetooth device you want to configure.
5) A screen opens that allows you to change the device’s name or unpair it.
Bluetooth is a short-range wireless communications technology used to communicate between devices over a distance of about 8 meters.
To connect to a Bluetooth device, you must turn on your phone’s Bluetooth radio. The first time you use a new Bluetooth device, you must pair it with the one you want to connect. Then both devices should know how to connect each other securely. After that, they will connect automatically.
1) Touch “Settings”.
2) Touch “Network & connection”
3) Touch “Bluetooth”.
4) Switch to “On” position for searching the device.
5) Touch “Pair new device”, the device will scan for available devices and display the names.
6) Touch the device that you want to pair with.
You can also turn on Bluetooth from the Quick settings. Touch the indicator icon area and drag it downwards by your finger. You can turn Bluetooth on or off.
You can follow below steps to rename the Bluetooth.
1) Touch “Settings”.
2) Touch “Network & connection”
3) Touch “Bluetooth”.
*Make sure the Bluetooth is turned on.
4) Touch Device name.
5) A Window pop-up “Rename this device”.
Type the name you want and press “Rename” to save.
Bluetooth is a short-range wireless communications technology used to communicate between devices over a distance of about 8 meters.
To connect to a Bluetooth device, you must turn on your phone’s Bluetooth radio. The first time you use a new Bluetooth device, you must pair it with the one you want to connect. Then both devices should know how to connect each other securely. After that, they will connect automatically.
1) Touch “Settings”.
2) Touch “Network & connection”
3) Touch “Bluetooth”.
4) Switch to “On” position for searching the device.
5) Touch the device that you want to pair with.
You can also turn on Bluetooth from the Quick settings. Touch the indicator icon area and drag it downwards by your finger. You can turn Bluetooth on or off.
In Android 9.0, users can pair with five bluetooth devices at the same time and seamlessly switch between them. If there is an incoming call, it will automatically switch to any bluetooth speaker or other audio accessory that can handle the call.
In Android 9.0, the system will remember the volume of each bluetooth device automatically.
Your Camera app is a combination of camera and camcorder.
The screen acts as the viewfinder. First, position the object or landscape in the
viewfinder, touch the screen to focus if necessary and touch the ![]() icon to take
icon to take
the picture which will be automatically saved.
*The Camera focus sound switch is controlled by the sound effect of the system. If you want to turn off the focus sound, go setting to turn off the Ring volume.
You can check your photos by visiting the Gallery app.
Photos can be sort by moments or albums.
You can check your photos by visiting the Gallery app.
Photos can be sort by moments or albums.
You can follow below steps to add numbers in a message to contacts by opening the message-> Touch the number in a message which you want to add to the contacts -> Touch “Add to a contact” or “Create new contact”-> If you touch “Create new contact” -> Enter the name and related information ->Touch ![]() or
or ![]() to save. If you touch “Add to a contact” -> select a contact which you want to add -> Touch
to save. If you touch “Add to a contact” -> select a contact which you want to add -> Touch ![]() or
or ![]() to save.
to save.
If you have a Google Account, any contacts associated with that account are automatically backed up by Google. This means all of your contacts are always available on the web and can be synced to any Android phone which is set up with the same account.
It means your contacts are always available even if you lose your phone, switch to a new phone or use a desktop computer.
A. How to import your contacts directly into your Google Account?
Way 1:
1) Install the SIM card with your contacts on it in your new phone.
2) Touch “Contacts” app.
3) Touch icon![]() in the top right corner of screen.
in the top right corner of screen.
4) Touch “Settings”.
5) Touch “Import/Export”.
6) Choose a place where you want copy your contacts, take phone for example and touch “NEXT”.
7) Choose your Google Account and touch “NEXT”.
8) Choose the contacts you want to copy or touch icon![]() to select all contacts and touch icon
to select all contacts and touch icon ![]() in the top right corner of screen.
in the top right corner of screen.
Way 2:
1) Install the SIM card with your contacts on it in your new phone.
2) Access “phone” app .
3) Touch icon ![]() .
.
4) Touch “Settings”.
5) Touch “Import/Export”.
6) Please refer to Way 1 step 6 and subsequent steps to continue.
B. How to add a Google Account to your phone?
Way 1:
1) Touch “Contacts” app.
2) Touch icon![]() .
.
3) Touch “Settings”.
4) Touch “Accounts”.
5) Touch “Add account”.
6) Select “Google”.
7) Type your Google account and touch “NEXT”.
8) Type your password and touch “NEXT”.
9) Touch “I agree”.
10) Swipe down to bottom of screen
11) Touch "ACCEPT"
Way 2:
1) Touch “Settings” from Home screen or under main menu.
2) Touch “Accounts”.
3) Touch Add account.
4) Touch Google.
5) Sign in a Google account.
Way 3:
1) Access “phone” app .
2) Touch icon ![]() .
.
3) Touch “Settings”.
4) Touch “Manage account”.
5) Touch Add account.
6) Touch Google.
7) Sign in a Google account.
You can follow below steps to import contacts.
1) Touch “Contacts” app to open contact screen.
2) Touch menu key ![]() in the top right corner of screen, then a menu appears.
in the top right corner of screen, then a menu appears.
3) Touch “Settings”
4) Touch “Import/Export”.
5) Choose the one you want to copy from contacts, then touch “NEXT”. Choose the one you want to copy contacts to and touch “NEXT”.
6) Select the contacts you want to Import/Export.
7) Touch “![]() ” in the top to finish the contacts import.
” in the top to finish the contacts import.
To turn on the USB debugging, you can follow below steps.
1) Go to “Settings” -> “System”->“About phone” -> “Build number”.
2) Touch the Build number no less than 7 times.
3) When you see a warning that mentioned developer mode already turned on.
4) Back to “Settings” again, you will find the “Developer options”.
5) Activate “Developer options”.
6) Activate “USB debugging”.
1) Power off your device.
2) Insert or remove your SIM card.
3) Restart your device.
Note: Please don’t insert or remove your SIM card while your cell phone is power-on. Otherwise, you may damage the SIM card.
To turn on the USB debugging, you can follow below steps.
5) Go to “Settings” -> “System”-> “About phone” -> “Build number”.
6) Touch the Build number no less than 7 times.
7) When you see a warning that mentioned developer mode already turned on.
8) Back to “Settings” again, you will find the “Developer options”.
9) Activate “Developer options”.
10) Activate “USB debugging”.
1) Power off your device.
2) Insert or remove your SIM card.
3) Restart your device.
Note: Please don’t insert or remove your SIM card while your cell phone is power-on. Otherwise, you may damage the SIM card.
You can hide the navigation bar as following steps.
1) Touch “Settings”.
2) Touch Display.
3) Touch Navigation bar.
4) Activate Hide Navigation bar hide.
5) Touch icon ![]() to hide the navigation bar.
to hide the navigation bar.
To add new applications on the Home screen, touch the menu icon![]() , you will see all the applications. Long-press and drag an application to your desired screen.
, you will see all the applications. Long-press and drag an application to your desired screen.
To add new widgets to the Home screen, long press the Home screen that’s not occupied, touch icon “WIDGETS”, you will see all the widgets. Touch and drag a widget to your desired screen.
You can set wallpaper by accessing menu-> “Settings” -> “Display” -> Wallpaper”. Select a wallpaper source from “Live wallpapers/Photos/Wallpapers”, select wallpaper as you like and touch “Set wallpaper” at the top, choose which screen you would like to set wallpaper.
Its icon appears on the top of the screen when you receive a notification. You may also hear a sound notice depending on your sound setting. With the notification bar, you can:
1) See your notifications by swiping your finger down from the top of the screen.
2) Respond to a notification by touching it.
3) Dismiss a notification bar by swipe it sideways.
4) Dismiss all event-based notifications by touching Broom icon ![]() at the bottom of screen. Some on-going notifications may remain.
at the bottom of screen. Some on-going notifications may remain.
5) Access to quick settings by dragging the Status Bar down again in the Notification Panel or drag the Status Bar down by your finger and then you can access more settings by touching the icon![]() at the bottom of the screen.
at the bottom of the screen.
6) Touch a notification to expand or collapse the notifications. Then news with photos and headlines can be displayed completely in the notification. So more new information can be shown in the new notification.
7) Call or SMS back directly from notification, and even hang up the call.
8) Gmail notifications with new emails display.
9) Calendar notification and email to all attendees with an embedded quick response to notify them something.
10) You can also customize notification tile by touch Edit icon![]() , press and drag a tile to add or to remove.
, press and drag a tile to add or to remove.
In order to protect your personal information, you can adjust your phone’s lock settings by pressing “Menu” key at Home screen -> “Settings” -> “Security&location” -> “Screen lock” ->Touch the type of lock you would like to use.
After you set a lock, a lock screen displays whenever your screen is woken up, requesting pattern, PIN, or other specified key.
Notes:
Screen lock options are listed in the approximate order of the strength of their security, starting with “None” and “Swipe”, which provide no security.
Go to “Settings” -> “Display”->“Brightness level”, on the slider; drag the slider handle to the right and improve the brightness of screen.
If there is no significant improvement, we recommend you to update the system version, connect a WiFi network and go to “Settings” -> “System” -> “Updates” -> “CHECK FOR UPDATES NOW” -> “Download” -> “Install”
You can hide the navigation bar as following steps.
1) Touch “Settings”.
2) Touch “Display”.
3) Touch “Navigation bar”
4) Select a mode as you like to activate “Hide Navigation bar”.
5) Touch icon ![]() to hide the navigation bar.
to hide the navigation bar.
After Android 8.0, Google has made improvements to Android's notification feature. This’s a new Notification Dots feature. It’s a small loop point above the application icon. It only appears when the app has unread notifications. When you press and hold the application icon, it will be quickly previewed in a “bubble window”. When these unread notifications are deleted in notification center, the marker points on the application icon will disappear.
To add new applications on the Home screen, swiping your finger up from the bottom of the screen on Home screen, you will see all the applications. Long-press and drag an application to your desired screen.
To add new widgets to the Home screen, long press the Home screen that’s not occupied, touch icon “Widgets”, you will see all the widgets at the screen. Touch and drag a widget to your desired screen.
You can set wallpaper by accessing into main menu-> “Settings” -> “Display” -> “Wallpaper”. Select a wallpaper source from “Live wallpapers/Photos/Wallpapers” -> select wallpaper as you like and touch![]() at the top right corner of screen -> choose which screen you would like to set wallpaper.
at the top right corner of screen -> choose which screen you would like to set wallpaper.
Its icon appears on the top of the screen when you receive a notification. You may also hear a sound notice depending on your sound setting. With the notification bar, you can:
1) See your notifications by swiping your finger down from the top of the screen.
2) Respond to a notification by touching it.
3) Dismiss a notification bar by swipe it sideways.
4) Dismiss all event-based notifications by touching Broom icon ![]() at the bottom of screen. Some on-going notifications may remain.
at the bottom of screen. Some on-going notifications may remain.
5) Access to quick settings by swiping to right in the Notification Panel or drag the Status Bar down by your finger and then you can access more settings by touching the icon at ![]() the bottom of the screen.
the bottom of the screen.
6) Touch a notification to expand or collapse the notifications. Then news with photos and headlines can be displayed completely in the notification. So more new information can be shown in the new notification.
7) Call or SMS back directly from notification, and even hang up the call.
8) Gmail notifications with new emails display.
9) Calendar notification and email to all attendees with an embedded quick response to notify them something.
10) You can also customize notification tile by touch Edit icon ![]() , press and drag a tile to add or to remove.
, press and drag a tile to add or to remove.
Go to “Settings” -> “Display”-> “Brightness level”, on the slider; drag the slider handle to the right to improve the brightness of screen.
If there is no significant improvement, we recommend you to update the system version, connect a WiFi network and go to “Settings” -> “System” -> “System updates” -> “CHECK FOR UPDATES NOW” -> “Download” -> “Install”.
1) Touch “Settings” icon from Home screen.
2) Touch “System”
3) Touch “Languages & input”.
4) Touch “Virtual keyboard” to choose the input method you want.
You can follow these steps to delete a message.
1) Touch to open the message.
2) Touch and hold for seconds on the message that you want to delete.
3) Touch Delete icon![]() at the top of the screen.
at the top of the screen.
4) Touch “DELETE” in the warning window.
You can follow below steps to delete a conversation.
1) Touch to open the “Messages” app, you will see all the conversation list.
2) Touch and hold a conversation that you want to delete until a trash can icon![]() appears at the top of screen and touch “DELETE” in the warning window to delete all checked conversations.
appears at the top of screen and touch “DELETE” in the warning window to delete all checked conversations.
3) If you want to delete more conversations, you can touch them to choose.
4) Touch the trash can icon![]() at the top of screen to delete all checked conversations.
at the top of screen to delete all checked conversations.
Follow below steps to forward messages.
1) Touch to open the message.
2) Touch and hold the message that you want to forward.
3) Touch icon![]() at the top right coner of the screen.
at the top right coner of the screen.
4) Touch “Forward”
5) Select the contacts from the list or touch “New message”.
6) Enter the recipient number or select from the contacts.
7) Touch send icon![]()
In the past, if you want to get an address and navigate to that place. It takes a lot of steps. First, you get the information, then you pick up the text, copy, open the map, paste it, and start to navigate. In Android 8.0, it will save a lot of things. Intelligent text selection (Smart Text Selection) is the function of using Google's machine learning to detect when to select addresses or phone numbers, then automatically apply them to the corresponding application. If you click on the address of a restaurant sent to you by a friend, Google will know what you want and use the map to start the route automatically. Telephone numbers, e-mail addresses and so on can also be done.
1) Touch “Settings” icon from Home screen.
2) Touch “System”
3) Touch “Languages & input”.
4) Touch “Virtual keyboard” to choose the input method you want.
In the past, if you want to get an address and navigate to that place. It takes a lot of steps. First, you get the information, then you pick up the text, copy, open the map, paste it, and start to navigate. After Android 8.0, it will save a lot of things. Intelligent text selection (Smart Text Selection) is the function of using Google's machine learning to detect when to select addresses or phone numbers, then automatically apply them to the corresponding application. If you click on the address of a restaurant sent to you by a friend, Google will know what you want and use the map to start the route automatically. Telephone numbers, e-mail addresses and so on can also be done.
When you have a new voicemail message, the voicemail icon ![]() appears in the notification bar. Swipe down the status bar and touch it to view your notifications.
appears in the notification bar. Swipe down the status bar and touch it to view your notifications.
You can also change you voicemail settings by accessing into menu->Touch “Phone” -> press the menu key ![]() in the top right corner of screen -> “Settings” -> Call settings-> Voicemail, then change setting.
in the top right corner of screen -> “Settings” -> Call settings-> Voicemail, then change setting.
You can do like this:
1) Call the first person.
2) Touch “Add call”![]() (this function may under menu according to the different phones), then you can choose the third person you want to call.
(this function may under menu according to the different phones), then you can choose the third person you want to call.
3) When you get through the second person or the third person (It depends how many calls you want to merge), you can touch “Merge calls” ![]() to make a conference call.
to make a conference call.
*Notes: Three ways calling also need network/SIM card support.
You can edit quick response text in the “Phone” app-> press the menu key![]() in the top right corner of screen -> “Settings” ->“Quick responses”.
in the top right corner of screen -> “Settings” ->“Quick responses”.
There’re 3 ways to silence the ringer before answering the call.
Way 1: Press the Volume Down/Up or Power button on the side of your device.
Way 2:Enable Gesture function by going to “Phone” app and press the menu key in the top right corner of screen -> “Settings” -> “Accessibility”-> activate “Turn over to mute”, then you can mute incoming calls by turning the phone over when a call is coming.
Way 3: Go to menu-> “Settings” -> “Sound”-> activate “Silent mode”.
Way 4: Drag the Status Bar down by your finger and then touch “Sound” icon to change to “Vibrate” or “Mute”
You can touch![]() to mute your microphone.
to mute your microphone.
Access into menu, touch “Phone” app, then touch ![]() to check recent call records.
to check recent call records.
It’s call log tab which shows recent calls. There’re three different color arrow icons beside a call to indicate the type of calls.
![]() Means missed incoming call
Means missed incoming call
![]() Means received incoming call
Means received incoming call
![]() Means outgoing call
Means outgoing call
The incoming call screen will open when you receive a phone call. It shows caller ID and any additional information about the caller that you have saved in Contacts.
Situation 1: If your product screen is locked or unlit when you receive a phone call.
![]() Touch and slide up to answer
Touch and slide up to answer
![]() Touch and slide up to reject
Touch and slide up to reject
![]() Touch to send messages
Touch to send messages
![]() Touch to set “Call back in 5(10) min”
Touch to set “Call back in 5(10) min”
Situation 2: If your product screen is bright and unlocked when you receive a phone call.
Touch “DECLINE” to reject
Touch “ANSWER” to answer
Touch to ![]() enter into another interface
enter into another interface
![]() Touch to answer
Touch to answer
![]() Touch to reject
Touch to reject
![]() Touch to send messages
Touch to send messages
![]() Touch to set “Call back in 5(10) min”
Touch to set “Call back in 5(10) min”
1) If there is another call coming in, you will get a notice in the screen and ring notice.
2) You can answer it directly, and at the same time the other call will be on hold.
3) You can touch ![]() icon to switch to another call in process.
icon to switch to another call in process.
4) You can touch ![]() icon to accept this call and end the current call.
icon to accept this call and end the current call.
Note: please make sure you have held the third way calling service with your SIM card.
You can do like this:
1) Call the first person.
2) Touch “Add call” ![]() (this function may under menu according to the different phones), then you can choose the third person you want to call.
(this function may under menu according to the different phones), then you can choose the third person you want to call.
3) When you get through the second person or the third person (It depends how many calls you want to merge), you can touch “Merge calls”![]() to make a conference call.
to make a conference call.
*Notes: Three ways calling also need network/SIM card support.
You can edit quick response text in the “Phone” app-> press the menu key ![]() in the top right corner of screen -> “Settings” -> “Quick responses”.
in the top right corner of screen -> “Settings” -> “Quick responses”.
There’re 4 ways to silence the ringer before answering the call.
Way 1: Press the Volume Down/Up or Power button on the side of your device.
Way 2:Enable Gesture function by going to “Phone” app and press the menu key ![]() in the top right corner of screen -> “Settings” -> “Accessibility”-> activate “Turn over to mute”, then you can mute incoming calls by turning the phone over when a call is coming.
in the top right corner of screen -> “Settings” -> “Accessibility”-> activate “Turn over to mute”, then you can mute incoming calls by turning the phone over when a call is coming.
Way 3: Go to menu -> “Settings” -> “Sound”-> activate “Silent mode”.
Way 4: Drag the Status Bar down by your finger and then touch “Sound” icon to change to “Vibrate” or “Mute”.
Note: press “power” key and “volume up” key at the same time to switch to vibration mode quickly.
The incoming call screen will open when you receive a phone call. It shows caller ID and any additional information about the caller that you have saved in Contacts.
Situation 1: If your product screen is locked or unlit when you receive a phone call.
![]() Touch and slide up to answer
Touch and slide up to answer
![]() Touch and slide up to reject
Touch and slide up to reject
![]() Touch to send messages
Touch to send messages
![]() Touch to set “Call back in 5(10) min”
Touch to set “Call back in 5(10) min”
Situation 2: If your product screen is bright and unlocked when you receive a phone call.
Touch “DECLINE” to reject
Touch “ANSWER” to answer
Touch ![]() to enter into another interface
to enter into another interface
![]() Touch to answer
Touch to answer
![]() Touch to reject
Touch to reject
![]() Touch to send messages
Touch to send messages
![]() Touch to set “Call back in 5(10) min”
Touch to set “Call back in 5(10) min”
1) If there is another call coming in, you will get a notice in the screen and ring notice.
2) You can answer it directly, and at the same time the other call will be on hold.
3) You can touch ![]() or
or ![]() or
or ![]() icon to switch to another call in process.
icon to switch to another call in process.
4) You can touch ![]() or
or ![]() icon to accept this call and end the current call.
icon to accept this call and end the current call.
Note: please make sure you have held the third way calling service with your SIM card.
You may need to enter the original Google account that was used on this phone after you execute Factory data reset, otherwise you will not be able to use the phone. This is FRP (Factory Reset Protection) function.
If you don’t remember your Google account data, please complete Google account recovery procedure. In case you can’t recovery it, please apply to repair center.
1) When your phone back to the sun ray, the speed of unlocking is slow or maybe it fails to unlock.
2) When the ambient brightness is dark, the speed of unlocking is slow or maybe it fails to unlock.
3) When you are wearing sunglasses or something covers your face, it fails to unlock.
You may need to enter the original Google account that was used on this phone after you execute Factory data reset, otherwise you will not be able to use the phone. This is FRP (Factory Reset Protection) function.
If you don’t remember your Google account data, please complete Google account recovery procedure. In case you can’t recovery it, please apply to the repair center.
1) When your phone back to the sun ray, the speed of unlocking is slow or maybe it fails to unlock.
2) When the ambient brightness is dark, the speed of unlocking is slow or maybe it fails to unlock.
3) When you are wearing sunglasses or something covers your face, it fails to unlock.
If you want to format SD card as portable after it has been set as internal in your device, go to Settings -> Smart Manager -> Storage -> SD card ->touch icon ![]() at the top right corner-> Storage settings->Format.
at the top right corner-> Storage settings->Format.
Go to Settings ->Smart manager->Storage -> touch Portable storage “SD card”, then you can browse the contents of SD card, such as downloads, music, pictures, etc.
Go to “Settings” -> “Smart manager” -> “Storage” -> touch Portable storage “SD card”, then you can browse the contents of SD card, such as downloads, musics, pictures, etc.
We recommend you to don’t use the phone for long time while charging, it will harm your battery.
When your device connects to a PC, the device will ask you which mode you want to use.
To transfer data between the device and computer, select Transfer files mode.
To transfer photos or files if MTP is not supported (PTP), select Transfer photos (PTP).
To disable all data and file transfer connection with computer and put device in charging only mode, select Charge this device.
Computers that use Windows XP might not connect properly, because they don’t have the proper drivers installed by default. To fix this, download and install Windows Media Player 11 or higher which contains the proper drivers.
Computers that use Mac OS X 10.5 or later might not connect properly, because they don’t have the proper drivers installed by default. To fix this, download and install Android File Transfer which contains the proper drivers.
The warning is a normal recommendation message and not harmful to battery or phone, phone will start recharging once returning to normal temperature.
You can follow below actions to make phone return to normal temperature:
1) It is suggested not to expose your phone in the sunshine for long time;
2) Close large power consumption applications, such as music , chatting applications, GPS application, 3D gaming, video streaming etc.;
3) Reduce the brightness of screen to lower the temperature.
The warning is the normal consequence of the CPU handling excessive data, which makes battery warm It's a normal phenomenon that battery and phone will get warm.
You can follow below actions to make phone return to normal temperature:
1) It is suggested not to expose your phone in the sunshine for long time;
2) Close large power consumption applications, such as music , chatting applications, GPS application, 3D gaming, video streaming etc.;
3) Reduce the brightness of screen to lower the temperature.
1) Using non-standard charger instead of official charger.
2) Using damaged cables or chargers, or charging when moisture is present, which can cause fire, electric shock, injury, or damage to your phone or other property.
3) Exposing your phone or battery to heating sources.
**When you use the official charger to charge your phone, make sure the USB cable is inserted into the power adapter fully before you plug the adapter into a power outlet.
Three ways calling / multi-conference call function requires network/SIM card support. If your SIM card isn’t activated such function by your service provider, the mobile will show a message “Can't conference call” when you try to use it. Please contact your service provider to enable multi-conference call service for your SIM card.
We recommend you not to use the phone for a long time while charging, which will harm your battery.
When your device connects to a PC, the device will ask you which mode you want to use.
To transfer data between the device and computer, select “Transfer files” mode.
To transfer photos or files if MTP is not supported (PTP), select “Transfer photos(PTP)”.
To disable all data and file transfer connection with computer and put device in charging only mode, select “Charge this device”.
Computers that use Windows XP might not connect properly, because they don’t have the proper drivers installed by default. To fix this, download and install Windows Media Player 11 or higher which contains the proper drivers.
Computers that use Mac OS X 10.5 or later might not connect properly, because they don’t have the proper drivers installed by default. To fix this, download and install Android File Transfer which contains the proper drivers.
The warning is a normal recommendation message and not harmful to battery or phone, phone will start recharging once returning to normal temperature.
You can follow below actions to make phone return to normal temperature:
1) It is suggested not to expose your phone in the sunshine for long time;
2) Close large power consumption applications, such as music, chatting applications, GPS application, 3D gaming, video streaming etc.;
3) Reduce the brightness of screen to lower the temperature.
The warning is the normal consequence of the CPU handling excessive data, which makes battery warm. It's a normal phenomenon that battery and phone will get warm.
You can follow below actions to make phone return to normal temperature:
1) It is suggested not to expose your phone in the sunshine for long time;
2) Close large power consumption applications, such as music, chatting applications, GPS application, 3D gaming, video streaming etc.;
3) Reduce the brightness of screen to lower the temperature.
1) Using non-standard charger instead of official charger.
2) Using damaged cables or chargers, or charging when moisture is present, which can cause fire, electric shock, injury, or damage to your phone or other property.
3) Exposing your phone or battery to heating sources.
**When you use the official charger to charge your phone, make sure the USB cable is inserted into the power adapter fully before you plug the adapter into a power outlet.
Three ways calling / multi-conference call function requires network/SIM card support. If your SIM card isn’t activated such function by your service provider, the mobile will show a message “Can’t conference calls” when you try to use it. Please contact your service provider to enable multi-conference call service for your SIM card.